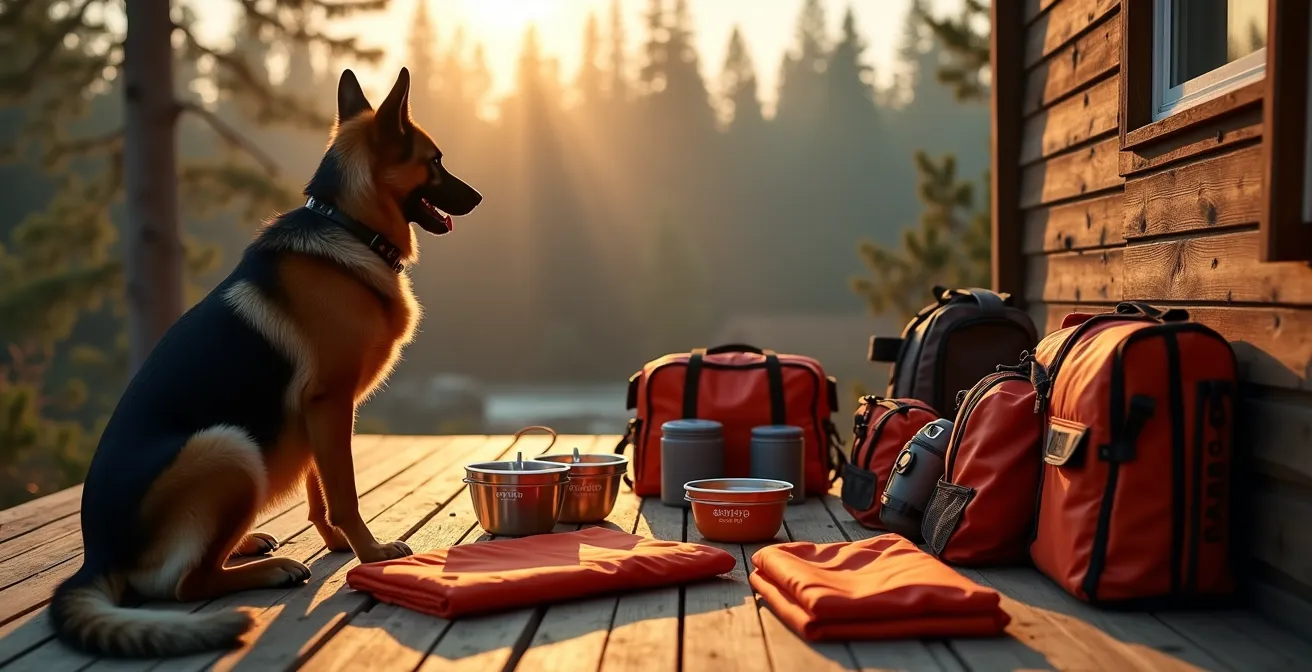
Packing a basic bag for your pet isn’t enough; a true survival kit for a Canadian wildfire must anticipate the cascading system failures of a real, chaotic evacuation.
- Standard advice often overlooks critical dangers like toxic ingredients in human survival food and the specific environmental stressors pets face.
- Preparedness hinges on creating “evacuation muscle memory” for your pet and ensuring your identification systems have built-in redundancy.
Recommendation: Shift your focus from simply packing items to building a system that addresses the unique logistical and physiological challenges your pet will face in the first 72 hours of a wildfire emergency.
The evacuation alert blares. Smoke thickens the air, painting the sky an unsettling orange. Amid the rush to grab documents and essentials, a crucial question arises for thousands of families in British Columbia, Alberta, and across Canada: What about the pets? The common advice is to have a “go-bag” ready with food, water, and medication. But in the chaos of a real evacuation, this simplistic approach can fail catastrophically.
The reality of a Canadian wildfire event is far more complex. Last year alone, an unprecedented fire season saw a record-breaking 17,203,625 hectares burned, forcing entire communities to flee. In these situations, your pet isn’t just an evacuee; they are a living creature subjected to immense physiological and psychological stress. A poorly planned kit can inadvertently introduce new dangers, from toxic food to dehydration exacerbated by anxiety and smoke.
But what if the key isn’t just what you pack, but *why* you pack it? What if the most effective survival strategy lies in anticipating the hidden points of failure—the overwhelmed shelters, the useless microchip, the dangerous assumptions about supplies? This guide moves beyond the generic checklist. It’s a strategic framework for Canadian pet owners, designed to build a resilient 72-hour kit that accounts for the cascading failures of a real-world disaster. We will deconstruct the common wisdom and rebuild it with practical, life-saving insights from disaster response professionals.
This article provides a detailed breakdown of the critical components for your pet’s emergency kit, moving from immediate needs like food and shelter to essential administrative preparations. The following summary outlines the key areas we will cover to ensure you and your pet are fully prepared before an evacuation order is issued.
Summary: Your Pet’s Wildfire Evacuation Blueprint
- Why Is Human Survival Food Dangerous for Your Dog in an Emergency?
- How to Train Your Cat to Enter a Carrier in Under 30 Seconds During an Alarm?
- Public Shelter or Pet-Friendly Hotel: Which Is Safer During a Crisis?
- The Microchip Mistake That Leaves Displaced Pets Lost Forever
- How to Calculate Water Rations for a 60lb Dog for 3 Days?
- Why Is the First Exam Date Crucial for Your Insurance Waiting Period?
- Why Does -10°C Feel Like -20°C to a Small Dog Near the Ground?
- What Are the “10 Essentials” for Canine Hiking in the Canadian Rockies?
Why Is Human Survival Food Dangerous for Your Dog in an Emergency?
In a frantic evacuation, it’s tempting to assume any food is better than no food. You might grab a few high-calorie survival bars from your own kit for your dog, thinking it’s a temporary solution. This is a critical and potentially fatal mistake. Many human-grade “survival foods,” especially those designed for long shelf life and palatability, contain ingredients that are highly toxic to dogs. The most common culprit is xylitol, an artificial sweetener found in protein bars, peanut butter, and baked goods.
The danger of xylitol cannot be overstated. According to veterinary toxicologists, even small amounts can cause a rapid, life-threatening drop in a dog’s blood sugar. The Merck Veterinary Manual states that doses of xylitol greater than 100 mg/kg can trigger severe hypoglycemia, with acute liver failure possible at higher concentrations. In a crisis where veterinary care is inaccessible, xylitol poisoning is a death sentence. Other common ingredients like onion and garlic powder can cause severe gastrointestinal distress and damage red blood cells, leading to a cascading health crisis when your pet is already under extreme stress.
The only safe approach is to create a completely separate, dedicated food supply for your pet. This eliminates the risk of accidental poisoning and ensures their nutritional needs are met without introducing ingredients that cause digestive upset, a serious complication during an evacuation.
Action Plan: Pet Emergency Food Safety
- Label Audit: Before packing, meticulously check all MRE (Meals, Ready-to-Eat) and survival bar labels for xylitol, onion powder, garlic powder, and any artificial sweeteners. Assume they are present if not explicitly stated otherwise.
- Dedicated Supply: Create a separate, airtight, and waterproof container with your pet’s regular commercial food. This ensures dietary consistency and prevents stress-induced digestive issues.
- Caloric Calculation: Pre-calculate and pack a 72-hour supply based on your dog’s specific needs (roughly 25-30 calories per pound of body weight per day), adjusting for stress.
- Digestive First-Aid: Include pet-specific digestive aids like a probiotic (FortiFlora) and anti-diarrheal medication, but only after approval from your veterinarian.
- Stress Reduction Treats: Pack a small bag of familiar, high-value treats. These can be crucial for encouraging a stressed pet to eat and for reinforcing calm behaviour.
How to Train Your Cat to Enter a Carrier in Under 30 Seconds During an Alarm?
For many cat owners, the most stressful part of an evacuation isn’t packing; it’s the vision of a terrified cat hiding under a bed while precious minutes tick away. Forcing a panicked animal into a carrier is dangerous for both of you. The solution is not force, but building “evacuation muscle memory.” The goal is to transform the carrier from a symbol of fear into a portable safe space, a personal den your cat enters voluntarily, even under duress.
This process starts long before any emergency. Leave the carrier out in your living space permanently, with the door open and comfortable bedding inside. Place treats, toys, or catnip inside regularly, so your cat associates it with positive experiences. Feed your cat near the carrier, then eventually inside it. The key is to make the carrier a high-value, non-threatening piece of furniture. As the BC SPCA notes, in a chaotic shelter environment, “Having somewhere they can play or hide gives them a chance to feel safe wherever they are.” Your carrier should be that first safe space.
Once the cat is comfortable, introduce a verbal cue like “carrier” or “in” followed by a high-value treat tossed inside. Practice this for a few minutes each day. Gradually, you can start closing the door for a few seconds, then a few minutes, always rewarding with praise and treats. This turns a stressful fight into a reflexive, positive action. Under the blare of an alarm, this training is what gets your cat to safety in under 30 seconds.
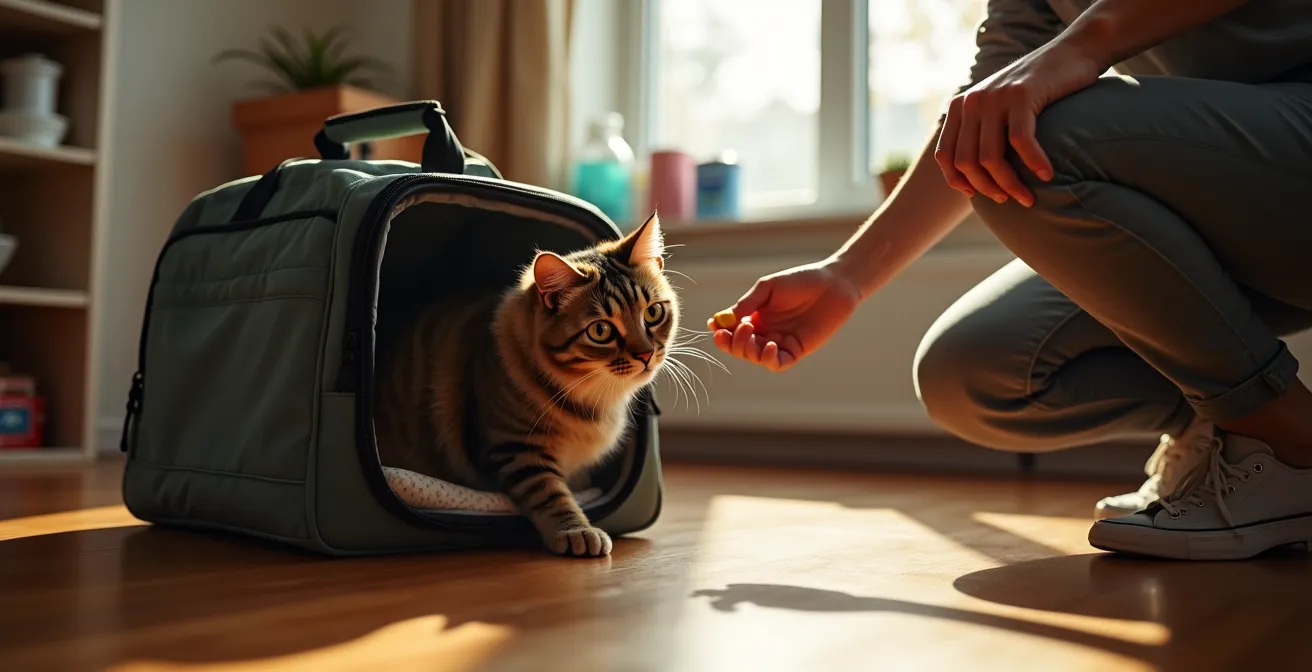
As you can see in this ideal scenario, the cat is not being forced but is choosing to enter the carrier, demonstrating a foundation of trust and positive association. This is the outcome your training should aim for: a calm, cooperative partner in your evacuation plan, not a source of panic and delay.
Public Shelter or Pet-Friendly Hotel: Which Is Safer During a Crisis?
You’ve successfully evacuated with your pet. Now comes the next challenge: where to go? The two most common options, a public evacuation shelter and a pet-friendly hotel, offer vastly different environments, each with its own risks and benefits. Your decision should be based on your pet’s temperament, your financial situation, and an understanding of the bio-security risks involved. A public shelter, while free, can be an environment of extreme stress for an animal.
The constant noise, unfamiliar smells, and proximity to hundreds of other stressed people and animals can elevate your pet’s anxiety to dangerous levels. From a health perspective, these centers are high-risk zones for the transmission of kennel cough, fleas, and other communicable diseases. While some may have basic veterinary triage, they are not equipped for comprehensive care. A pet-friendly hotel offers a quieter, more private space, which can significantly lower your pet’s stress. However, this comes at a cost, and availability plummets during a large-scale evacuation. It is crucial to have a list of potential hotels (and their pet policies) in surrounding communities pre-researched.
A third, often overlooked option is a community foster network, organized by local SPCAs or rescue groups. These can provide a low-stress home environment, but availability is highly dependent on volunteer capacity. The most prudent action is to know your options *before* a disaster strikes. As the BC SPCA advises in its wildfire support guide:
Please contact the Emergency Social Services coordinating evacuation centres for your area, as they will be able to let you know about options for you and your pets. You can also contact BC SPCA Animal Helpline at 1-855-622-7722 for details about emergency boarding.
– BC SPCA, BC Wildfire Animal Evacuation Support Guide
To help you make an informed choice, the following table compares the key criteria for each option, based on information from emergency management bodies like Alberta Emergency Management Agency.
| Criteria | Canadian Red Cross Shelter | Pet-Friendly Hotel | Community Foster Network |
|---|---|---|---|
| Pet Access | Not permitted inside; outdoor holding areas only | Full access with restrictions | Full integration with host family |
| Cost | Free | $100-200/night (may be covered by insurance) | Usually free through volunteers |
| Availability | Limited capacity during major evacuations | First-come basis; may fill quickly | Depends on volunteer availability |
| Medical Support | Basic veterinary triage sometimes available | None on-site | Varies by host experience |
| Stress Level for Pet | High (crowded, noisy, unfamiliar) | Moderate (confined space) | Low (home environment) |
The Microchip Mistake That Leaves Displaced Pets Lost Forever
A microchip is a marvel of technology, a tiny beacon of hope for a lost pet. But it has a critical weakness that many owners discover only after it’s too late: the chip is only as good as the data linked to it. The single most common and heartbreaking mistake in pet recovery is an outdated microchip registration. A chip registered to an old address or a disconnected phone number is functionally useless, turning a sophisticated piece of tech into a meaningless implant.
In the chaos of a wildfire evacuation, pets can get separated from their families and end up hundreds of kilometers away. A rescuer in a different province who scans your pet’s chip will see your old contact information, hitting a dead end. This is a catastrophic point of failure in your pet’s safety net. It is absolutely essential to treat your microchip registration like a driver’s license or passport. Every time you move or change your phone number, updating your pet’s microchip information should be at the top of your to-do list, especially before the start of wildfire season (typically May through October in Western Canada).
This requires system redundancy in your approach to identification. A microchip is your primary internal ID, but it must be backed up by external IDs: a collar with clearly engraved tags showing your name and current cell phone number, and a municipal license tag. These systems do not talk to each other; you must maintain them all. In your 72-hour kit, you should also include a physical copy of your pet’s microchip number, the registry company’s name (e.g., 24PetWatch, EIDAP), and their contact information.
The moment a vet or shelter worker scans for a chip is the moment of truth. Ensuring the information they find is accurate and up-to-date is one of the most powerful actions you can take to guarantee a reunion with your beloved pet.
How to Calculate Water Rations for a 60lb Dog for 3 Days?
Water is the single most important supply in your kit, but simply grabbing a few bottles is not a viable strategy. You need to calculate your pet’s water needs with precision, accounting for the unique stress multipliers of a wildfire evacuation. A common rule of thumb, as noted in BC SPCA emergency guidelines, is that dogs need 70 ml per kilogram of body weight per day. For a 60lb (27kg) dog, that’s about 1.9 liters daily. However, this is a baseline for normal conditions, not a crisis.
During an evacuation, several factors dramatically increase a dog’s water requirements. Anxiety and stress lead to excessive panting, which causes rapid water loss through respiration. Smoke inhalation irritates the respiratory tract and increases the body’s need for fluid to clear contaminants. Heat stress from high ambient temperatures or confinement in a hot vehicle further accelerates dehydration. A proper calculation must factor in these multipliers.
To prepare adequately, you must calculate a worst-case scenario. This means starting with the base requirement and then layering on percentages for each potential stressor. Remember to pack water in sturdy, sealed containers (like Nalgene bottles or dedicated water bricks, not flimsy disposable bottles that can puncture) and include a collapsible, lightweight bowl. The goal is to have more water than you think you’ll need; in an emergency, water is an asset you can’t have too much of.
Here is a step-by-step formula to calculate a more realistic 72-hour water supply for a 60lb dog under evacuation conditions:
- Base Requirement: A 60lb dog needs roughly 60 oz (1.8 liters) per day in normal conditions.
- Smoke Inhalation Multiplier: Add 25% for exposure to heavy smoke, bringing the total to 75 oz.
- Heat Stress Multiplier: For temperatures over 30°C, add another 30%, raising the need to approximately 97.5 oz.
- Anxiety Panting Multiplier: Factor in another 20% for stress-induced dehydration, for a new daily total of about 117 oz.
- 72-Hour Total: Multiply the daily need by three days: 117 oz × 3 = 351 oz (10.4 liters).
- Safety Buffer: Finally, add a 20% buffer for spillage or to help another animal, bringing your minimum packed total to 421 oz (12.5 liters or about 3.3 US gallons).
Why Is the First Exam Date Crucial for Your Insurance Waiting Period?
Pet insurance can be a financial lifesaver during an emergency, but it’s not a magic wand you can wave after a disaster. Every policy in Canada comes with waiting periods, a set amount of time after purchase during which coverage is not active. Overlooking this detail can lead to a devastating discovery: that the injuries or illnesses sustained during an evacuation are not covered. The most critical date is not when you buy the policy, but the date of your pet’s first veterinary exam in relation to when the policy’s waiting period ends.
Most insurance providers require a health exam within a certain timeframe of the policy start date to establish a baseline of your pet’s health and note any pre-existing conditions. More importantly, waiting periods for accidents are typically a few days, but for illnesses, they can be 14 to 30 days. Wildfire season in Alberta officially runs from March 1st to October 31st. If you purchase a policy on May 1st, a 30-day illness waiting period means conditions like smoke-inhalation-induced pneumonia won’t be covered until June. This leaves you dangerously exposed during the peak spring fire season.
Case Study: The 2023 Alberta Wildfire Insurance Gap
During the record-breaking 2023 wildfire season in Alberta, many pet owners who had recently purchased insurance discovered this gap the hard way. They found that claims for burns, smoke inhalation, and other evacuation-related ailments were denied because the incidents occurred within the policy’s 30-day waiting period for illnesses. This real-world example from a major Canadian wildfire event underscores the absolute necessity of securing and activating your insurance coverage well before the threat level rises, ideally before March 1st.
The strategic approach is to treat pet insurance as a pre-season preparation. Your goal should be to have all waiting periods expired *before* the wildfire risk becomes acute. This means starting your research in the winter and finalizing your policy by early March at the latest. This foresight ensures your financial safety net is actually in place when you need it most.
Why Does -10°C Feel Like -20°C to a Small Dog Near the Ground?
While wildfires are associated with summer heat, evacuations create situations of extreme temperature swings that can be just as dangerous. You might be dealing with scorching daytime heat one moment and shivering in a drafty evacuation center or your car overnight the next. Small dogs are particularly vulnerable to cold because their bodies are much closer to the ground, where cold, dense air settles. At floor level in a gymnasium or on the ground outside, the effective temperature can be significantly lower than the ambient air temperature, making -10°C feel much colder to a small terrier or chihuahua.
Your kit must account for both ends of the temperature spectrum. For heat, the most immediate danger during a summer evacuation is hot pavement. During a wildfire, you may be forced to walk on asphalt roads or parking lots. As a warning from Interior Health in BC notes, when air temperatures reach 29°C, pavement can climb as high as 57°C, hot enough to cause severe burns to a dog’s paw pads in seconds. Your kit must include protective booties and you should check pavement temperature with the back of your hand before letting your pet walk on it.
For cold, the solution is a lightweight but effective warming layer. A simple Mylar “space blanket” is one of the most versatile and life-saving items you can pack. It weighs almost nothing, takes up minimal space, and reflects up to 90% of body heat back to the source. Wrapping a small, shivering dog in a Mylar blanket can prevent hypothermia in a cold car or a large, unheated shelter.
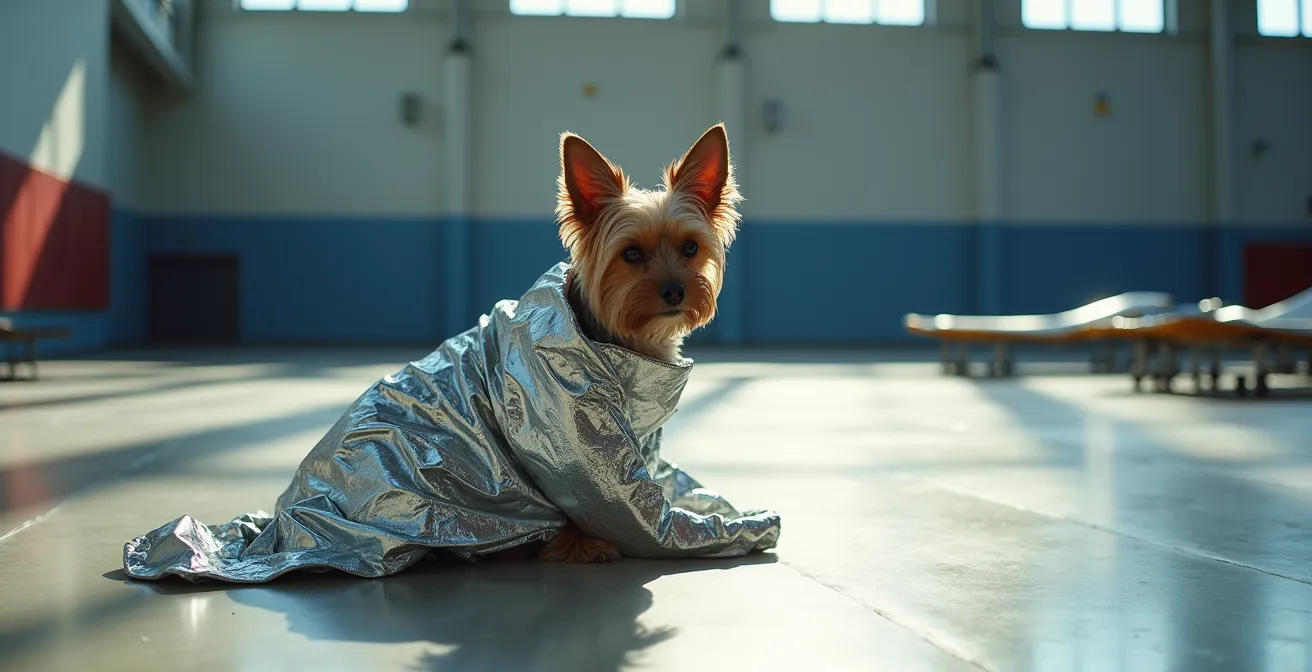
This image highlights the vulnerability of a small animal in a vast, impersonal space. The thermal blanket creates a micro-environment of warmth, providing critical protection against the cold that pools at ground level and ensuring the pet’s core temperature remains stable.
Key Takeaways
- Human survival food contains ingredients like xylitol that are toxic to pets; always pack a dedicated, pet-safe food supply.
- Carrier training is not about forcing a pet, but about building “evacuation muscle memory” by making the carrier a permanent, positive safe space.
- A microchip with outdated contact information is useless. System redundancy with physical tags is essential, and data must be updated with every move.
What Are the “10 Essentials” for Canine Hiking in the Canadian Rockies?
Many Canadians who live in fire-prone areas are also avid hikers, familiar with the “10 Essentials” system for backcountry safety. This existing knowledge is a powerful foundation for building an evacuation kit. The key is not to start from scratch, but to upgrade your hiking mindset for a disaster context. A wildfire evacuation kit is essentially a high-stakes, urban-to-wildland version of a hiking pack, with specific and critical modifications.
Think about navigation: for hiking, it’s a map and GPS. For an evacuation, it’s pet ID and documentation, including microchip papers and vaccination records, alongside maps of evacuation routes. Sun protection on a trail is sunscreen; in an evacuation, it’s also eye protection from smoke and ash, meaning you should add pet-safe saline eye wash to your first-aid kit. The most significant shift is the concept of “fire.” In hiking, it’s a tool for survival. In a wildfire, fire is the threat, so this “essential” is replaced with cooling items like vests and ice packs.
By framing your evacuation kit as an upgraded version of a system you already understand, the task becomes less daunting and more logical. You are simply adapting your skills from protecting your pet on a mountain trail to protecting them during a forced displacement. This approach helps ensure all bases are covered in a systematic way.
The following table cross-references the standard hiking essentials with their wildfire evacuation counterparts, highlighting the necessary upgrades for your 72-hour kit.
| Hiking Essential | Standard Hiking Use | Wildfire Evacuation Application | Required Upgrades |
|---|---|---|---|
| Navigation | Trail maps, GPS | Pet ID tags, microchip docs | Add evacuation route maps, emergency contacts |
| Sun Protection | Dog sunscreen, shade | Eye protection from smoke | Add pet goggles, saline eye wash |
| First Aid | Basic wound care | Burn treatment, smoke inhalation | Add burn gel, pet-safe pain relief (vet-approved) |
| Shelter | Emergency bivvy | Carrier, crate, thermal blanket | Ensure carrier is sturdy and well-ventilated |
| Fire | Waterproof matches | N/A – Fire is the threat | Replace with cooling vests, ice packs |
| Repair Kit | Gear fixes | Carrier repairs, leash backup | Add zip ties, duct tape, spare collar |
| Nutrition | Day hike food | 72-hour supply | Triple quantity, add digestive aids |
| Hydration | Water bottles | 3-day sealed water supply | Add collapsible bowls, purification tablets |
| Extra Clothes | Weather protection | Cooling/warming gear | Add reflective vest, booties for hot pavement |
| Illumination | Headlamp for trails | Visibility in smoke | Add LED collar, glow sticks for the carrier |
Your pet’s survival is not a matter of chance; it is a direct result of your preparation. The time to build this comprehensive, strategically-minded kit is now, during the calm, not in the panic of an alert. Begin assembling your kit today.
Frequently Asked Questions About Pet Evacuation Preparedness
Which Canadian microchip registries should I check for my pet?
The major Canadian registries include 24PetWatch (the most common), EIDAP (Electronic ID Animal Project), and Petidco. There is no single unified national database, so it is critical that you register your pet’s chip with the specific company that provided it and keep that information in your records.
What happens if I move provinces and don’t update my microchip information?
Your pet becomes virtually untraceable in a new location. A chip registered to an Alberta phone number and address is useless if your pet is found in British Columbia after an evacuation. You must update your contact information immediately upon moving, especially before the wildfire season which typically intensifies from May to October.
Why isn’t my municipal pet license enough for identification?
Municipal licenses, such as those from cities like Calgary, Toronto, or Vancouver, operate on completely separate databases from microchip registries. The data is not shared between these systems. A shelter or vet in another jurisdiction will not have access to your city’s licensing database. Therefore, both your microchip and your municipal license must be kept current independently to provide a redundant identification system.