For Toronto dog owners tired of fishing lost boots from grimy snowbanks, paw wax isn’t just an alternative—it’s a superior system, but only if you use it correctly.
- Barrier wax (like Musher’s Secret) is for *before* the walk to block salt, not for healing.
- A strict “entryway decontamination” routine after every walk is non-negotiable to prevent chemical burns and toxic licking.
Recommendation: Adopt the two-product strategy: a protective barrier wax before you go out, and a moisturizing healing balm after the final paw-wipe of the day to repair and soothe.
Let’s be honest. There’s a special kind of Toronto winter frustration reserved for watching your dog high-step out of a bootie, leaving it to be swallowed by a grey, slushy snowbank. You paid good money for those boots, and now one is lost to the salt-stained abyss. Many dog owners face this dilemma: the boots that offer the best protection are the ones our dogs hate most, or the ones that simply won’t stay on. The common advice is to just switch to paw wax, but that’s where most people get it wrong. Simply slathering on some Musher’s Secret isn’t a complete solution.
The real secret isn’t in choosing wax *or* boots; it’s in understanding the complete “wax system.” This approach goes beyond a simple product swap. It involves knowing the crucial difference between a protective barrier and a healing balm, mastering an application technique that won’t ruin your floors, and implementing a rigorous post-walk cleaning protocol. This isn’t just about comfort; it’s about preventing the painful chemical burns caused by the industrial-strength de-icers used on our city’s streets and sidewalks. This guide will walk you through that system, giving you the practical, real-world advice you need to navigate a Toronto winter with a happy, healthy dog—and without losing another boot.
This article provides a complete framework for protecting your dog’s paws, from understanding the dangers of road salt to implementing a daily care routine. The following sections break down each component of the system.
Summary: The Urban Dog Owner’s Guide to Paw Protection
- Why Does Road Salt Cause Chemical Burns Between the Toes?
- How to Apply Musher’s Secret Without Leaving Grease Spots on Floors?
- Barrier Wax or Moisturizing Balm: Which One Prevents Cracking?
- The Licking Danger: Why You Must Wipe Wax Off After the Walk
- How to Trim Interdigital Fur to Preventing Ice Balls?
- Booties or Heat Pads: What Actually Keeps Toes Warm in Deep Snow?
- How to Time Topical Treatments Around Bath Days for Maximum Effect?
- Booties or Heat Pads: What Actually Keeps Toes Warm in Deep Snow?
Why Does Road Salt Cause Chemical Burns Between the Toes?
The first step in any effective protection plan is understanding the enemy. The rock salt and chemical de-icers spread across Toronto’s sidewalks aren’t just coarse; they are chemically hostile to your dog’s sensitive paw pads. When your dog walks, these salt crystals get trapped in the warm, moist areas between their toes—creating a perfect storm for injury. This isn’t simple chafing; it’s a direct chemical assault. According to veterinary experts, prolonged exposure to road salt causes chemical burns, severe dryness, and painful cracking of the paw pads.
The mechanism is twofold. First, the salt is abrasive, physically scratching and irritating the skin. Second, it’s a desiccant, meaning it aggressively draws moisture out of the paw pads, leaving them dry, chapped, and vulnerable to splitting. The Emergency Veterinary Clinic of Collingwood highlights this danger clearly:
Rock salt is both abrasive and extremely drying. It can cause redness and irritation between toes where crystals get trapped, dry chapped pads that eventually crack and may bleed, and chemical burns with repeated or heavy exposure.
– Emergency Veterinary Clinic of Collingwood, Winter Paw Care Guide
This is why a simple dry towel wipe is often not enough. The fine salt residue remains, continuing to damage the skin long after the walk is over. As the Ontario SPCA emphasizes, the harshness of Canadian winters requires a proactive approach, focusing not just on preventing burns but also on eliminating the risk of ingestion when a dog inevitably licks its irritated paws.
How to Apply Musher’s Secret Without Leaving Grease Spots on Floors?
One of the biggest complaints from urban dog owners who try paw wax is the greasy paw prints all over their condo lobby and hardwood floors. This is almost always due to improper application. The goal is to create a thin, breathable barrier, not a thick, greasy mess. Mastering the technique is key to making the wax system work for you and your home.
The trick is to apply a thin layer and allow a moment for it to absorb before letting your dog loose inside. Think of it like applying hand cream—a little goes a long way. Work the wax onto the pads, but also crucially, get it up in between the toes and on the sides of the feet where slush and salt spray hit. Applying it just before you head out the door, perhaps in your building’s hallway or garage, can prevent tracking it inside entirely. You want the wax to be on the paws to protect them outside, not on your floors.
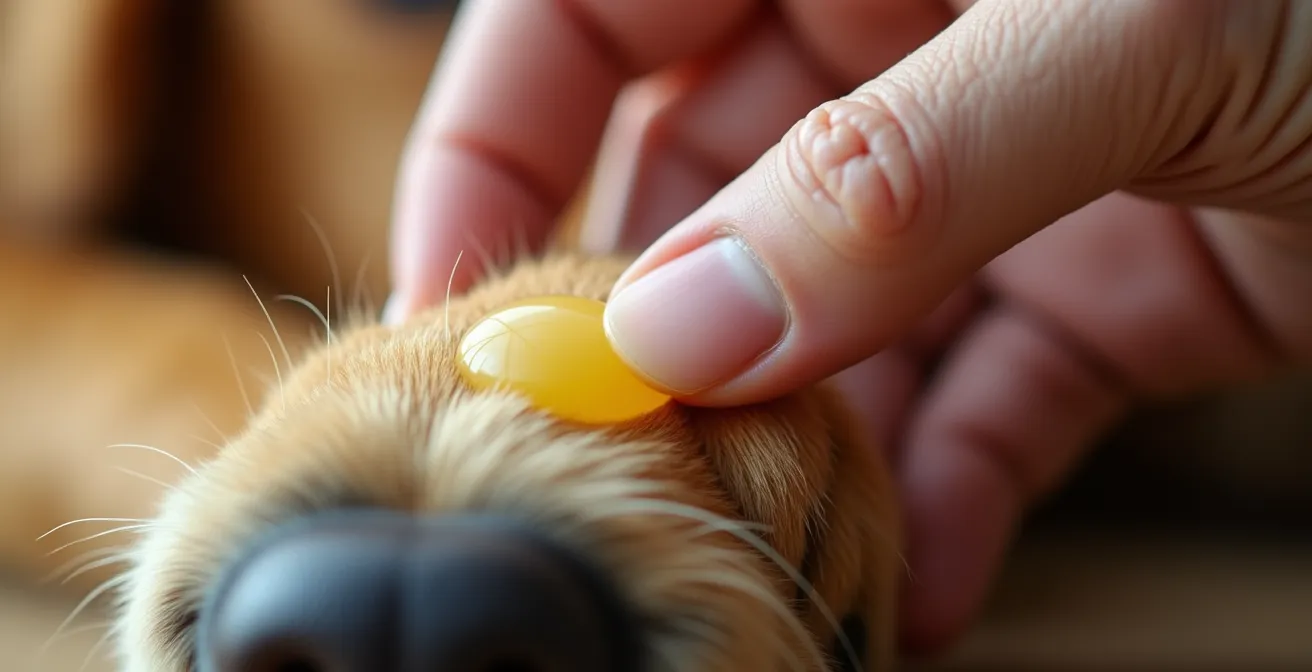
As you can see, the focus is on working a small amount of balm directly into the paw pad’s surface. Don’t just dab it on top. Gently massage it in. For dogs with ticklish feet, make it a positive experience with treats and praise. After the walk, the priority shifts to removing the wax (and the salt it has trapped), which we’ll cover later. A final, clean layer of a moisturizing balm can then be applied for overnight healing, but the protective pre-walk layer should always be applied with clean floors in mind.
Barrier Wax or Moisturizing Balm: Which One Prevents Cracking?
This is the most misunderstood part of the paw wax system. Not all paw balms are created equal, and using the wrong one at the wrong time can be ineffective or even counterproductive. You need two distinct products in your arsenal: a barrier wax for before the walk, and a moisturizing balm for after. Barrier waxes are designed to prevent damage, while moisturizing balms are designed to heal it.
A barrier wax, like the well-known Musher’s Secret, is formulated with waxes such as beeswax and carnauba wax. These ingredients create a semi-permeable shield over the paw pad. This shield blocks salt and chemicals from making direct contact with the skin, while still allowing the paw to “sweat” naturally. It’s your dog’s invisible bootie. In contrast, a moisturizing or healing balm is typically made with ingredients like shea butter, coconut oil, and lanolin. These are meant to be absorbed by the skin to soothe irritation, heal cracks, and restore moisture. Applying a healing balm *before* a walk on salty streets offers minimal protection and just makes salt stick to the paw more easily.
This table breaks down the fundamental differences between the two, based on an in-depth analysis of winter paw products.
| Feature | Barrier Wax (e.g., Musher’s Secret) | Moisturizing Balm |
|---|---|---|
| Primary Function | Creates a protective layer against salt/chemicals | Heals and repairs damaged paw pads |
| When to Use | BEFORE walks as prevention | AFTER walks for recovery |
| Key Ingredients | Beeswax, carnauba wax, candelilla wax | Shea butter, coconut oil, lanolin |
| Protection Level | High barrier against external damage | Low barrier, high healing properties |
| Best For | Active protection during walks | Overnight healing of cracks |
Using a barrier wax prevents cracks from forming in the first place. If cracks have already appeared, you must focus on cleaning and healing with a moisturizing balm, and consider using boots temporarily to prevent debris from getting into the open wounds.
The Licking Danger: Why You Must Wipe Wax Off After the Walk
Applying a barrier wax is only half the battle. The most critical step for your dog’s safety is what you do the moment you walk back through the door: the entryway decontamination. The wax has done its job by creating a shield, but that shield is now coated in a toxic film of salt, de-icing chemicals, and street grime. If you don’t remove it, your dog will. Dogs instinctively lick their paws, especially if they feel any irritation, and ingesting these chemicals is extremely dangerous.
While a small amount of rock salt might just cause an upset stomach, the chemical de-icers used in cities contain ingredients like ethylene glycol or calcium chloride. As veterinary experts warn, large ingestions of de-icing chemicals can cause muscle tremors and seizures. This is a non-negotiable safety step. You must assume your dog’s paws are contaminated after every single winter walk and clean them thoroughly before they have a chance to lick.
Setting up a “decontamination station” by your door makes this process quick and easy. Have a towel, a shallow bowl of lukewarm water, and some pet-safe wipes ready to go. The goal is to be systematic every time.
Your Toronto Entryway Decontamination Protocol
- Surface Wipe: Use a dry towel to thoroughly wipe paws, removing all visible slush, snow, and surface salt crystals.
- Paw Dip: If there was heavy salt exposure, dip each paw into a bowl of lukewarm water to dissolve the stubborn chemical residue.
- Interdigital Clean: Use a pet-safe wipe or a damp cloth to carefully clean between each toe and pad. This is where the most dangerous chemicals hide.
- Thorough Dry: Dry the paws completely, paying special attention to the spaces between the pads to prevent fungal infections.
- Soothe and Heal: Once clean and dry, inspect the paws for any redness or irritation. Apply a thin layer of moisturizing (healing) balm if needed.
Making this protocol an unbreakable habit is the single most important part of the paw wax system to ensure your dog’s health and safety throughout the winter.
How to Trim Interdigital Fur to Preventing Ice Balls?
For many Toronto dogs, especially doodles, poodles, and other long-haired breeds, road salt isn’t the only winter menace. The long fur between their paw pads acts like a magnet for snow and slush, which can quickly freeze into painful ice balls. These hard clumps wedge between the toes, causing discomfort, chafing, and even splitting the skin, making it difficult for your dog to walk. Furthermore, this matted fur is a prime location for trapping salt and chemicals, making your cleaning job much harder.
The solution is simple but essential: regular grooming. Keeping the fur between the paw pads trimmed short is a critical component of winter paw care. As veterinary contributors on the Doberman Chat forum advise, you should “Trim the hair around the paws…to make sure none of the hair comes into contact with the ground.” This simple action dramatically reduces the surface area where ice can form. A paw with trimmed fur is easier to clean, easier to inspect for injuries, and allows for a much more effective application of barrier wax or healing balm.
This isn’t just anecdotal advice. The Ontario SPCA specifically recommends regular trimming for dogs with long hair between their pads, noting its particular importance for breeds popular in Toronto. By keeping this fur flush with the pads, you not only prevent painful ice ball formation but also minimize the amount of toxic slush your dog tracks into your home. You can do this carefully at home with a pair of blunt-nosed scissors or a small electric trimmer, or simply ask your groomer to pay special attention to the paws during winter appointments.
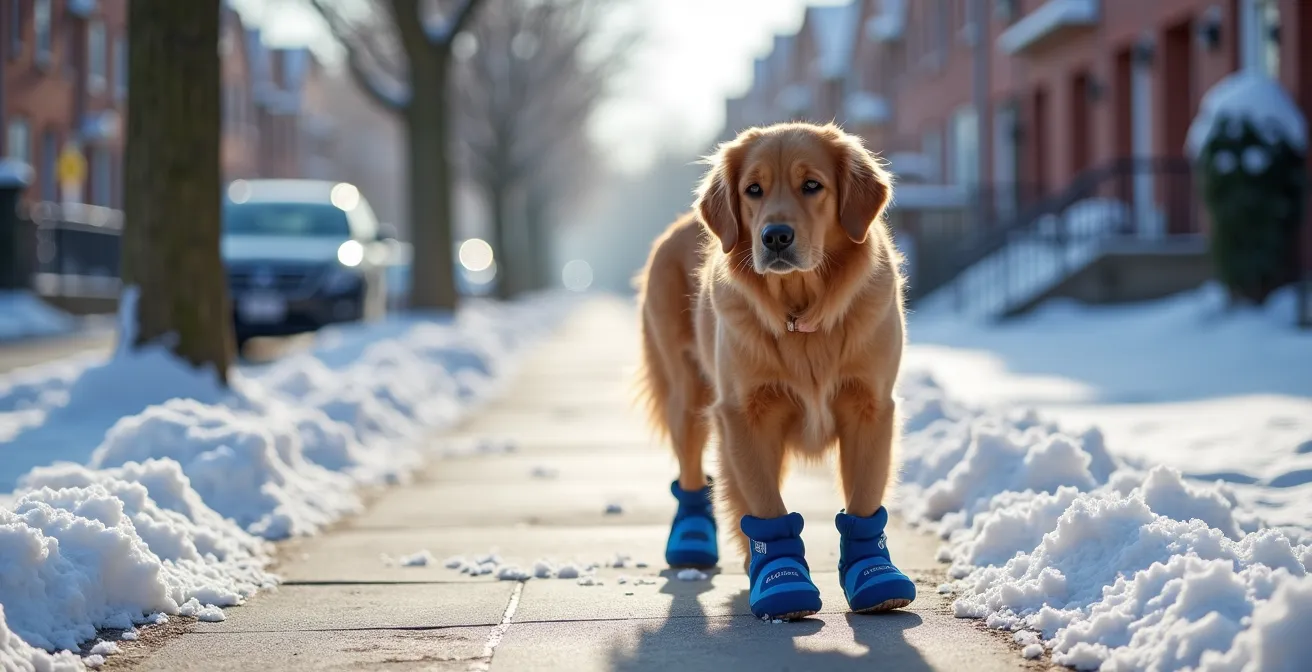
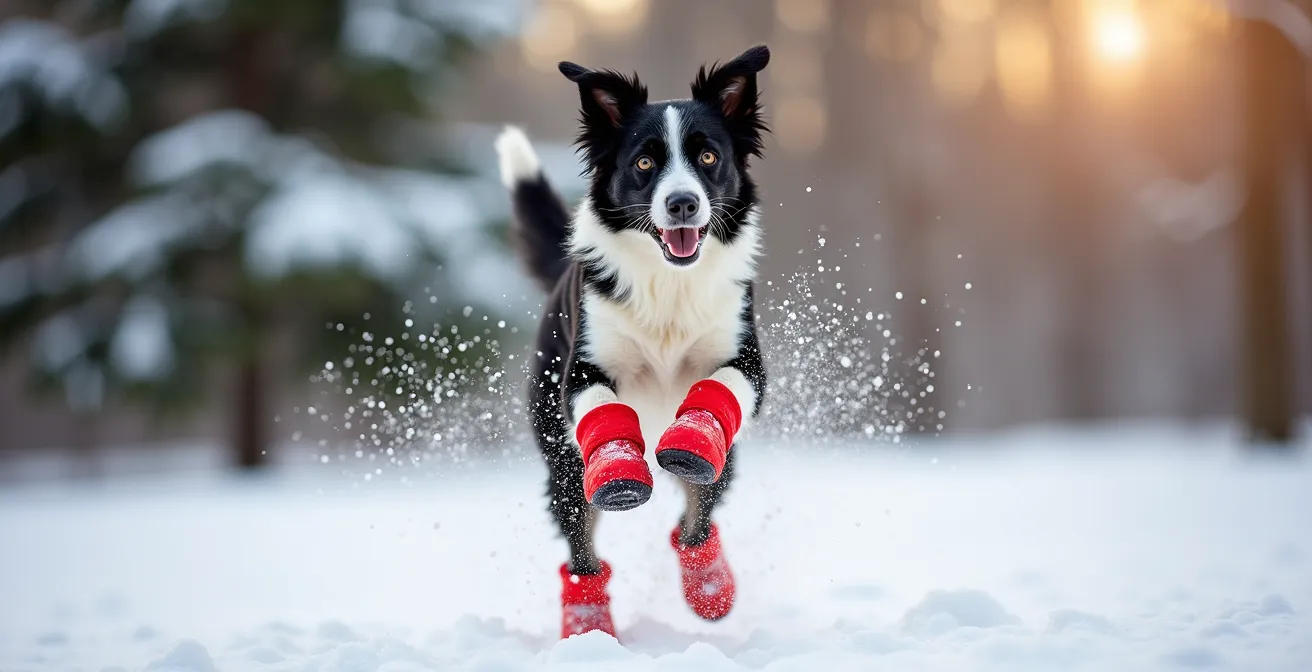
Booties or Heat Pads: What Actually Keeps Toes Warm in Deep Snow?
While a well-executed wax system is fantastic for most city walks, there are times when boots are still the superior choice. The primary function of wax is as a barrier against chemicals and abrasion, not as an insulator. In conditions of extreme cold or prolonged exposure to deep snow, boots provide one crucial thing that wax cannot: warmth. A dog’s paws have a unique circulatory system to handle cold, but even they have their limits.
So, when should you reach for the boots? The key factors are temperature and duration. For a quick trip around the block on a cleared sidewalk, wax is perfect. For a long off-leash romp in High Park after a fresh snowfall, insulated booties are the safer bet. As a general rule, emergency veterinarians recommend that booties should be used when pets are outside for more than 10 minutes in temperatures colder than -6.7°C (20°F). This threshold is a critical guideline for preventing frostbite, a very real danger in a Canadian winter.
Not all boots are the same, and the right choice depends on the activity. Here’s a quick breakdown of common options available at Canadian stores like Pet Valu or Canada Pooch:
- Insulated Fabric Booties: The warmest option. Best for deep snow and very cold temperatures. They trap body heat effectively.
- Rubber Boots: Less about warmth, more about forming a 100% waterproof barrier. These are excellent for extremely slushy, salty days on city sidewalks.
- Disposable Rubber Booties (e.g., Pawz): A great option for dogs that despise traditional boots. They offer excellent salt protection with a more “natural” feel, but provide very little insulation.
Heat pads are generally not recommended or necessary for dogs, as their paws are naturally equipped to handle cold, and properly insulated boots are sufficient to prevent frostbite in recreational situations.
How to Time Topical Treatments Around Bath Days for Maximum Effect?
Integrating your paw care system into your dog’s overall grooming routine is the final piece of the puzzle. The natural oils on your dog’s skin and paws are their first line of defense, and bathing, especially with shampoo, can strip these protective oils away, leaving the pads vulnerable. This means you need to be strategic about when you apply products relative to bath time.
The key is to distinguish between a full bath and a simple paw rinse. The daily “entryway decontamination” rinses with lukewarm water are essential and do not strip oils. You should continue these after every single walk. A full-body bath with shampoo, however, is a different story. According to veterinary advice, bathing with shampoo significantly reduces the natural oils that protect the paw pads. After a full shampoo bath, the skin is more porous and sensitive.
Therefore, you should create a “rest period” around bath days. Avoid applying any barrier wax for at least 12 to 24 hours after a full bath. This allows the skin time to recover and begin replenishing its natural oils. During this rest period, you can and should apply a generous layer of a high-quality moisturizing balm to help speed up the recovery process and deeply hydrate the clean paws. Once the 24-hour window has passed, you can resume your normal pre-walk application of barrier wax. In the harsh Toronto winter, limiting full shampoo baths to a weekly or bi-weekly schedule is often recommended to preserve as much of that natural protection as possible.
Key Takeaways
- The “Paw Wax System” is a three-part process: a barrier wax before walks, a rigorous decontamination wipe-down after, and a healing balm for recovery.
- Road salt causes painful chemical burns, not just dryness. Cleaning paws after every walk is a critical safety measure to prevent toxic ingestion from licking.
- Boots are still necessary for warmth in deep snow or during prolonged exposure to temperatures below -7°C (20°F).
Booties or Heat Pads: What Actually Keeps Toes Warm in Deep Snow?
So, after exploring the complete paw wax system, we return to the original question: wax or boots? The expert answer is not an “either/or” but a “when/then.” For the urban dog owner in Toronto, the ultimate strategy is to have both in your winter toolkit and to know precisely when to deploy each one. It’s about tailoring the protection to the day’s specific conditions.
Think of it like your own winter wardrobe. You don’t wear a heavy parka on a mild day, and you don’t wear a light jacket in a blizzard. For your dog, the paw wax system is your go-to for the vast majority of city walks: the quick outings on cleared, salted sidewalks where the primary threat is chemical. The boots are your heavy-duty gear, reserved for the adventures: the long walks in deep snow at the park, or on days when the temperature plummets into dangerous territory. By adopting this flexible approach, you provide the best possible protection in every scenario, ensuring your dog’s paws remain healthy, warm, and free from injury all winter long.
By mastering this complete system of protection, you can finally end the cycle of lost boots and winter paw problems, and confidently enjoy everything a Toronto winter has to offer with your four-legged companion.
Frequently Asked Questions about Paw Protection in Winter
Can I use both barrier wax and moisturizing balm?
Yes, absolutely. Veterinarians recommend a two-product strategy for best results: use a barrier wax before walks to block salt and chemicals, and then apply a healing, moisturizing balm after the final paw-wipe of the day to restore moisture and repair any minor irritation overnight.
What if my dog’s paws are already cracked?
If your dog’s paws already have open cracks or sores, your priority must be cleaning and healing. Gently clean the paws with lukewarm water and a pet-safe antiseptic, then apply a thick layer of a moisturizing healing balm. You should use dog boots to protect the open wounds from salt and debris until they are fully healed, as barrier wax could trap bacteria in the cracks.
Where can I buy these products in Toronto?
Both barrier waxes (like Musher’s Secret) and various moisturizing balms are widely available across Toronto. You can find them at major Canadian pet store chains such as Pet Valu and Ren’s Pets, as well as from many independent pet supply stores. You can also often find high-quality, locally made paw balms from Toronto artisans at farmers’ markets and craft fairs.