True safety for your dog in the Canadian Rockies goes far beyond a generic gear list; it’s about mastering risk management for this unique environment.
- Ecological Threats: Proactively manage risks like Giardia from streams and ticks using Canadian surveillance data.
- Biomechanical Gear: Choose and fit packs and harnesses based on your dog’s anatomy and trail demands to prevent injury.
Recommendation: Ditch the one-size-fits-all approach. Your next step is to audit your gear against the specific, science-backed protocols outlined in this guide.
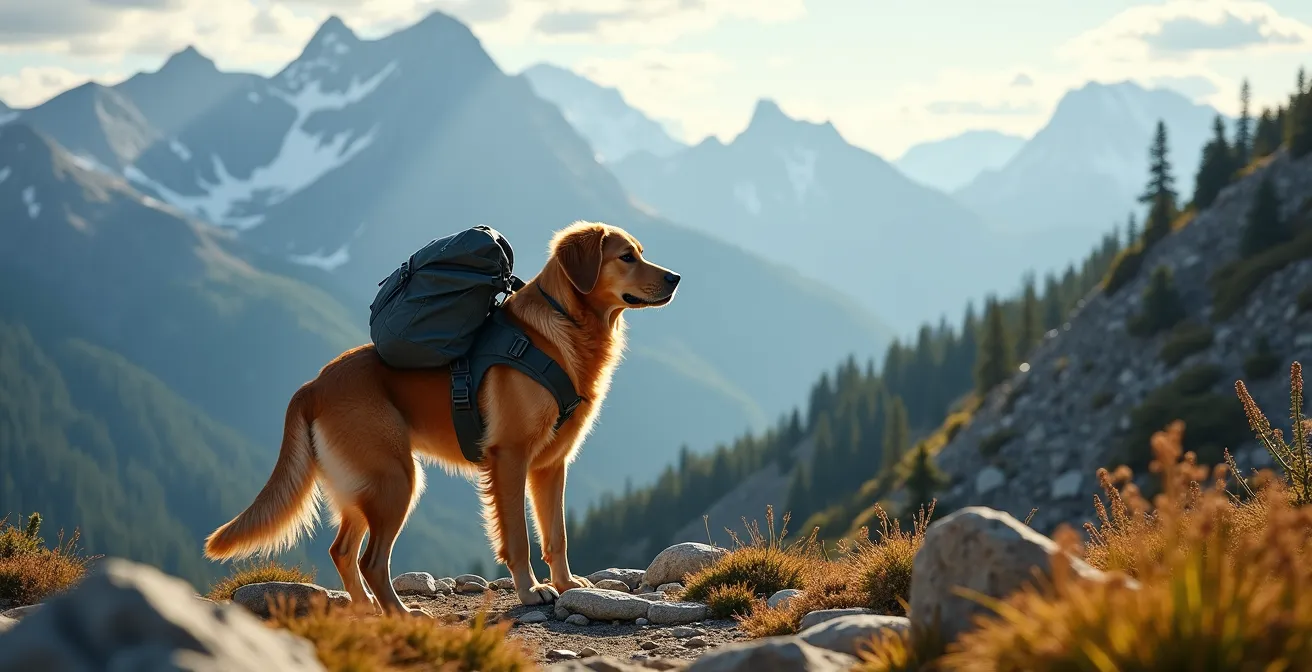
The vision is iconic: you and your loyal canine companion cresting a ridge in the Canadian Rockies, majestic peaks framing a perfect moment. For many hikers, sharing the backcountry with their dog is the ultimate goal. But translating this dream into a safe reality requires more than just a leash and a few treats. The common advice often circles around a generic “10 Essentials” list that barely scratches the surface of the specific challenges posed by this rugged wilderness.
While basics like water, food, and waste bags are non-negotiable, true preparedness in places like Banff, Jasper, or Kananaskis is not about the *what*, but the *why*. It’s about understanding the ecological risks unique to these mountains, from waterborne parasites to the specific behaviours of grizzly bears around domestic dogs. It’s about grasping canine biomechanics to prevent chafing and strain on high-mileage days. The standard checklist doesn’t account for the impact of altitude on your dog’s pack weight or the difference a Y-front harness makes on a steep ascent.
This guide moves beyond the platitudes. We’re not just giving you a list; we’re providing the strategic reasoning of a wilderness guide. You will learn to think proactively about safety, manage specific environmental threats, and select gear not just for its function, but for its suitability to the demanding terrain of the Rockies. This is your blueprint for transforming a standard hike into a safe, responsible, and truly unforgettable backcountry adventure with your dog.
To help you master these critical concepts, we’ve broken down the key areas of canine hiking safety. Each section addresses a common question but provides an uncommonly deep answer, ensuring you’re prepared for the realities of the trail.
Summary: Your Expert Guide to Canine Safety in the Rockies
- Why Do Bear Bells Often Fail to Deter Grizzlies from Dogs?
- How to Customize a Human First Aid Kit for Paw Cuts and Porcupine Quills?
- Weighted Backpack or Free Running: Which Burns More Energy on the Trail?
- The Stream Water Risk: Why Letting Dogs Drink from Creeks Causes Giardia
- How to Calculate the Max Pack Weight for Your Dog based on Body Mass?
- How to Use the "Worm Watch" Maps Before Booking Your Camping Trip?
- How to Create a "Tick-Safe Zone" Between Your Lawn and the Woods?
- Y-Front vs. Norway Harness: Which Prevents Chafing on 10km Hikes?
Why Do Bear Bells Often Fail to Deter Grizzlies from Dogs?
The gentle jingle of a bear bell is a common sound on Canadian trails, often mistaken as a reliable safety measure. However, for hikers with dogs, relying on a bell is a critical misstep in risk management. Research and field experience show that bells are largely ineffective. Their high-pitched, continuous sound doesn’t travel far, especially over the noise of a rushing stream or through dense vegetation. More concerningly, some wildlife biologists suggest the unfamiliar sound can pique a bear’s curiosity rather than warning it away. A curious grizzly is not an encounter you want to invite.
The primary issue is the dynamic a dog introduces. A dog’s scent, sudden movements, and potential barking can be perceived as a threat or challenge by a bear, escalating a simple sighting into a dangerous confrontation. The key to safety is not a passive tool like a bell, but an active wildlife encounter protocol. This begins with making loud, human noises. Call out, clap, or sing periodically. Your voice is a clear, unambiguous signal of human presence that bears have learned to associate with avoiding conflict.
Furthermore, group size is a significant deterrent. As the Parks Canada safety guidelines recommend, hiking in a tight group of four or more drastically reduces the likelihood of a serious bear encounter. For dog owners, this means keeping your dog on a short leash, directly beside you, and part of your “human group.” Never let your dog run ahead or lag behind. If you do encounter a bear, your dog must be under absolute physical control to prevent it from barking or chasing, which is the fastest way to trigger an aggressive response.
How to Customize a Human First Aid Kit for Paw Cuts and Porcupine Quills?
Carrying a first aid kit is standard practice, but a generic human kit is inadequate for the specific injuries a dog can sustain in the Rockies. The two most common and debilitating trail injuries are deep paw pad lacerations from sharp shale and encounters with porcupines. Your kit must be customized with tools and supplies to manage these scenarios effectively, at least until you can get to a veterinarian.
For paw cuts, you need more than a simple bandage. Your kit should contain: antiseptic wipes (like chlorhexidine) to clean the wound, a styptic powder or pen to stop bleeding, non-stick gauze pads, and self-adhering veterinary wrap (like Vetrap). This elastic wrap is crucial as it sticks to itself but not to fur, allowing you to create a secure, padded bandage that will stay on during the hike out. A dog bootie should be placed over the wrapped paw for protection.
The most intimidating scenario is a face full of porcupine quills. Never cut the quills, as this makes them harder to remove and more likely to break. Your kit must include a multi-tool with needle-nose pliers or, even better, a pair of hemostats (locking forceps). These provide the firm, steady grip needed to pull quills straight out. Attempting this on the trail is only for superficial or obstructive quills (e.g., near the eye or mouth) to provide immediate relief; extensive quilling requires immediate veterinary care as quills can migrate deep into tissue.
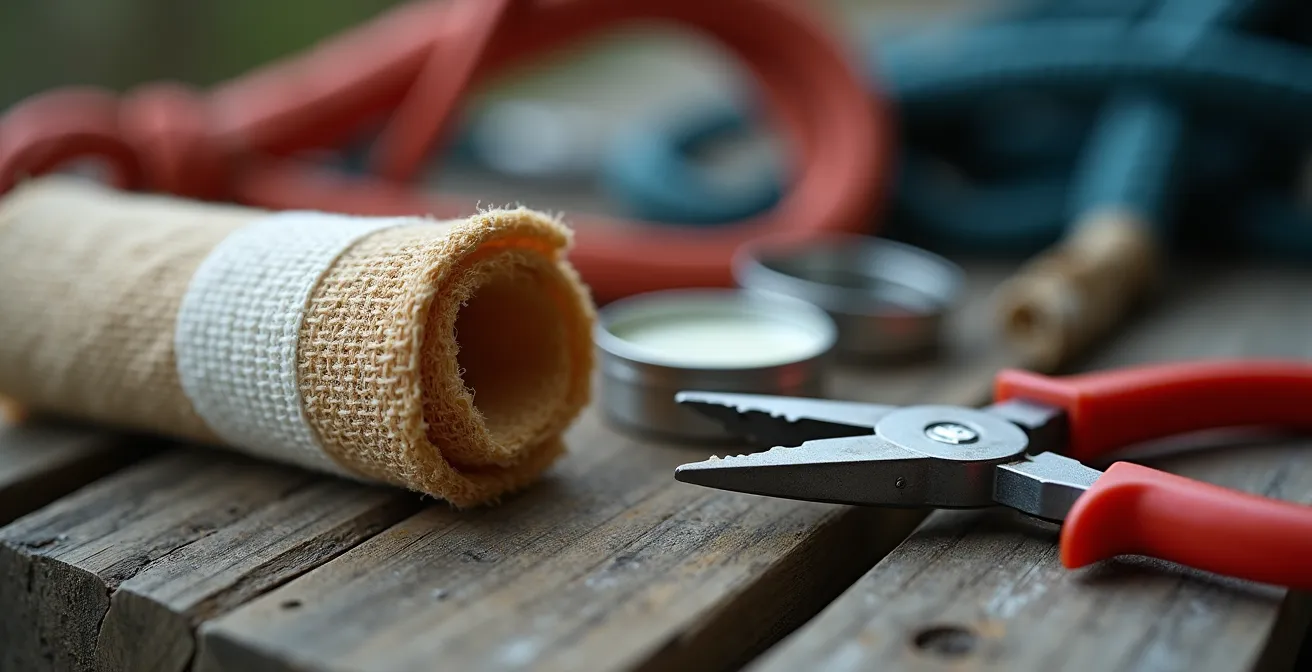
As this image of a well-stocked kit suggests, the focus is on specialized tools and materials. Beyond these two critical areas, add items like buffered aspirin (with vet consultation for dosage), an oral syringe for administering liquids, and a card with the contact information for the nearest 24-hour emergency vet clinic to your trail destination. This small, customized kit transforms you from a worried bystander into a capable first responder for your canine partner.
Weighted Backpack or Free Running: Which Burns More Energy on the Trail?
The debate between allowing a dog to run free (where permitted, which is almost nowhere in the Rockies) and having them carry a weighted pack often revolves around energy management. Intuitively, it seems free running would burn more energy through sprints and exploration. However, the reality is more complex. A properly weighted pack provides a steady, consistent energy burn, turning the hike into a focused job for the dog. This can lead to a calmer, more manageable trail companion.
Free running, conversely, involves highly variable energy expenditure with intense bursts of activity, which can lead to premature fatigue. More importantly, it dramatically increases safety risks. An off-leash dog is far more likely to have a negative wildlife encounter, wander onto treacherous terrain, or violate park regulations, which carry hefty fines. In the Canadian Rockies National Parks, dogs must be on-leash at all times. Therefore, the “free running” option is not legally viable.
The real question becomes: should your on-leash dog wear a pack? According to a 15-year field test of the Ruffwear Approach pack, the optimal load is 10-15% of the dog’s body weight, not the commonly cited maximum of 25%. This moderate weight provides a sense of purpose and controlled energy expenditure without risking spinal or joint strain. A pack also provides a convenient way for your dog to carry its own water, food, and bowl, lightening your load.
The following table breaks down the key considerations, making it clear why a weighted pack is the superior choice for both safety and trail management in the Rockies.
| Factor | Weighted Pack (10-15% body weight) | Free Running |
|---|---|---|
| Energy Expenditure | Moderate increase, steady burn | Variable, spikes with elevation |
| Trail Management | Slower pace, less wandering | Higher risk of wildlife encounters |
| Parks Canada Compliance | On-leash requirement met | Violates leash regulations, fines $115-$2000 |
| Altitude Adjustment (>1500m) | Reduce pack weight by 25% | Natural reduction in stamina |
| Recommended for Rockies | Yes – controlled and safe | No – legal and safety risks |
The Stream Water Risk: Why Letting Dogs Drink from Creeks Causes Giardia
The sight of a dog lapping eagerly from a crystal-clear mountain stream seems natural and harmless. In the Canadian Rockies, however, this is one of the most significant health risks you can expose your dog to. Backcountry water sources, no matter how pristine they appear, are often contaminated with microscopic parasites, the most notorious of which is Giardia lamblia. This parasite causes giardiasis, an intestinal infection leading to severe diarrhea, vomiting, and weight loss.
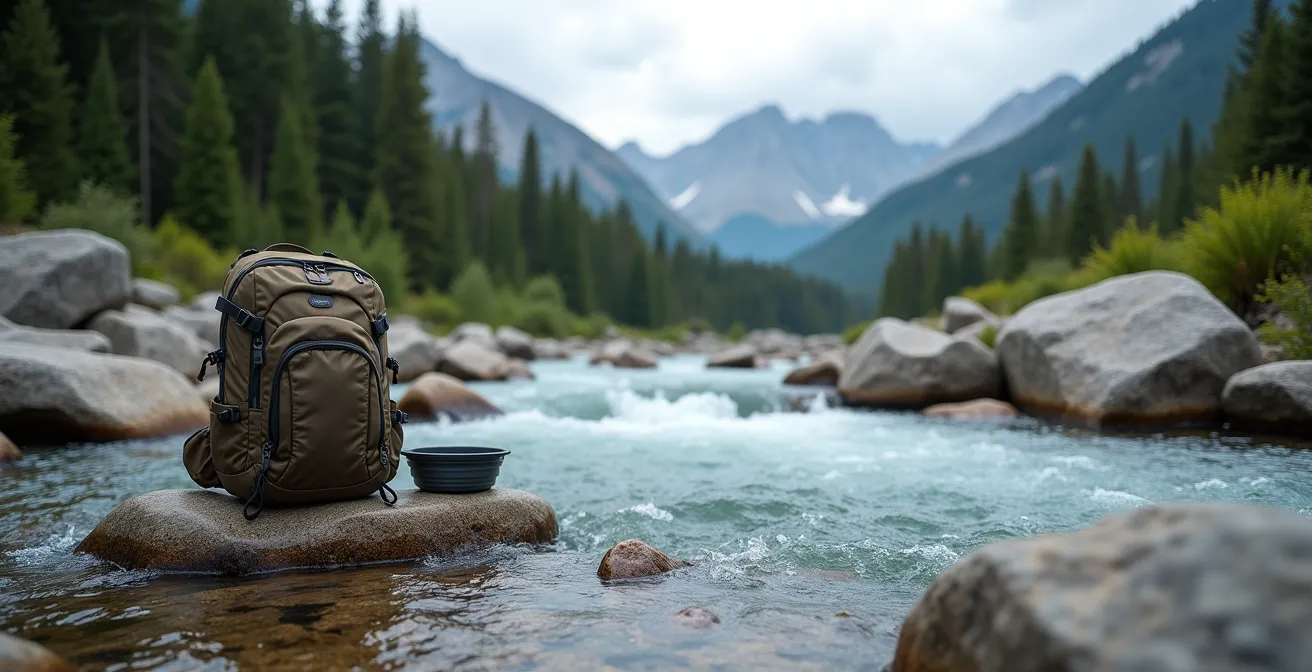
As this image of a tempting stream shows, the danger is invisible. Parks Canada backcountry safety warns that Giardia cysts are shed in the feces of infected wildlife (like beaver and deer) and domestic animals, and can survive for months in cold water. When your dog drinks from a stream, it ingests these cysts, which then “hatch” in the intestine and begin to multiply. The risk is not hypothetical. A Canadian study focusing on rural and Indigenous communities in Saskatchewan found that Giardia cysts were present in 21% of dog fecal samples. Crucially, the study identified these as a zoonotic genotype, meaning the infection can be transmitted from dogs to humans.
The only way to ensure your dog’s safety is to adopt the same water discipline you would for yourself. Carry and provide all water for your dog. For multi-day trips, this means bringing a reliable water filter or purification system (tablets or UV) and treating all water before giving it to your dog. A collapsible, lightweight dog bowl is an essential piece of gear. Allowing your dog to drink from streams is a gamble with high stakes, potentially ruining your trip and leading to a costly and uncomfortable recovery for your pet.
How to Calculate the Max Pack Weight for Your Dog based on Body Mass?
Equipping your dog with a backpack is an excellent way to manage their energy and have them carry their own supplies. However, loading it correctly is a science. Overloading a dog can lead to chafing, muscle strain, joint damage, and even heat exhaustion. The common “25% of body weight” rule is a dangerous oversimplification that fails to account for breed, fitness, and, most critically in the Rockies, altitude.
The correct approach is a conservative, incremental one. A fit, experienced hiking dog should start with a baseline of 10-15% of its ideal body weight. For a 60-pound Labrador, this means a pack weight of 6 to 9 pounds. This includes the weight of the pack itself plus its contents (food, water, bowl). This calculation must be adjusted for several factors. Brachycephalic (short-nosed) breeds like bulldogs or pugs are generally not suited for pack-carrying, but if attempted, the load must be drastically reduced. Most importantly, as you gain elevation, the air thins, and physical exertion becomes more difficult for both you and your dog. As a rule of thumb, for every 1,500 meters of elevation, you should consider reducing your dog’s pack weight by about 25% from its baseline.
The suitability of a dog for carrying a pack also varies significantly by breed, as their structure is adapted for different tasks. The following table provides a general index for common breeds in a mountain environment.
| Breed Type | Pack Capacity | Altitude Tolerance | Rocky Terrain Rating |
|---|---|---|---|
| Bernese Mountain Dog | 15-20% body weight | Excellent | Highly Suitable |
| Labrador Retriever | 12-15% body weight | Good | Suitable |
| Border Collie | 10-12% body weight | Good | Suitable |
| French Bulldog | Not Recommended | Poor | Not Suitable |
| German Shepherd | 15% body weight | Excellent | Highly Suitable |
How to Use the "Worm Watch" Maps Before Booking Your Camping Trip?
While bears and terrain are visible threats, one of the most insidious risks in the Canadian backcountry is the tick. Tick-borne illnesses like Lyme disease are a growing concern across Canada, and high-traffic wilderness areas are prime habitats. Proactive prevention is far more effective than reactive treatment, and modern technology provides a powerful tool for trip planning. Instead of a generic “Worm Watch,” the essential resource for Canadian hikers is eTick.ca.
eTick.ca is a public platform for image-based tick identification and population monitoring, developed with support from the Public Health Agency of Canada. It allows you to see real-time data on where ticks are being found and what species they are. Before booking a campsite or planning a route, you can consult the eTick.ca map for your target region (e.g., the Bow Valley, Waterton). If the map shows a high concentration of blacklegged ticks (the primary vector for Lyme disease), you can make an informed decision to choose a different area or to be hyper-vigilant with your prevention protocol. According to a report on the platform, eTick.ca has analyzed over 4,500 ticks from veterinary clinics, creating an invaluable public health database for identifying high-risk zones.
Using this tool transforms your approach from passive worry to active risk management. After your hike, if you find a tick on your dog, you can submit a photo to the platform for identification, usually within 24 hours. This information not only helps you assess your dog’s risk but also contributes to the national surveillance effort, helping other hikers. Prevention, however, remains the best strategy. This includes using a veterinarian-prescribed tick repellent and performing a thorough check of your dog after every hike.
Action Plan: Trailhead Tick Check Protocol
- At the trailhead, before getting in your vehicle, perform a full-body tick check on your dog.
- Focus on key areas: inside and around the ears, around the eyelids, under the collar, in the ‘armpits’, and between the toes.
- If a tick is found, use fine-tipped tweezers to grasp it as close to the skin’s surface as possible.
- Pull upward with steady, even pressure. Avoid twisting or jerking, which can cause the mouth-parts to break off.
- Place the tick in a sealed bag or container, clean the bite area with a dog-safe antiseptic, and note the date.
How to Create a "Tick-Safe Zone" Between Your Lawn and the Woods?
Tick prevention doesn’t stop at the trailhead. For many Canadians living near wooded areas, the backyard can be a primary source of exposure for pets. Ticks thrive in the moist, shaded leaf litter found in forests and the “ecotone,” or transition area, between the woods and your lawn. Creating a “tick-safe zone” is a landscaping strategy designed to minimize this risk by creating an environment that is hostile to ticks.
The most effective method is to create a physical barrier. A three-foot-wide border of dry wood chips or gravel between your lawn and any adjacent woods or tall grass is highly effective. Ticks dehydrate easily and will not willingly cross this dry, sunny barrier. This simple landscaping feature dramatically reduces the number of ticks migrating into your main yard area where your dog plays. Complement this by keeping your lawn mowed short and removing leaf litter, which eliminates the shady, moist habitat ticks need to survive.
It’s also important to think about all potential sources of tick introduction. As tick populations expand, so do the ways they can enter your environment. As Dr. Katie Clow of the Ontario Veterinary College notes in a University of Guelph tick prevention study, the risk isn’t just from local wildlife:
Tick checks aren’t required for rescue dogs coming into the country or before meeting their adoptive family. When rescuing an animal from another country, pet owners can take precautions to prevent ticks from getting into the home or from spreading new tick species within Canada.
– Dr. Katie Clow, University of Guelph Ontario Veterinary College tick prevention study
This highlights a broader principle: tick management is about controlling your immediate environment and being mindful of all vectors, whether it’s a deer at the edge of your property or a newly adopted pet. By creating a tick-safe zone and maintaining your yard, you establish a strong first line of defense, reducing the chances your dog will pick up a tick before you even get to the trail.
Key Takeaways
- Proactive Risk Management > Reactive Gear: True safety is about understanding and mitigating specific ecological threats like bears and parasites before you hit the trail.
- Canine Biomechanics are Critical: Injury prevention relies on choosing and fitting gear (packs, harnesses) that works with your dog’s anatomy, not against it.
- Use Canadian-Specific Resources: Leverage tools like Parks Canada guidelines and the eTick.ca platform for data relevant to your exact location in the Rockies.
Y-Front vs. Norway Harness: Which Prevents Chafing on 10km Hikes?
A harness is an essential piece of safety gear, providing better control than a collar and preventing neck injuries. However, on a long, strenuous hike in the Rockies, a poorly designed or ill-fitting harness can cause painful chafing and restrict movement, leading to fatigue and injury. The debate often centers on two main designs: the Y-front harness and the Norway (or T-bar) harness. For mountain terrain, the choice is clear from a biomechanical perspective.
The Norway harness features a horizontal strap that runs across the dog’s chest. While easy to put on, this design can directly impede the natural forward-and-back extension of the shoulder joint during a walking or running gait. Over thousands of repetitions on a 10km hike, this subtle restriction can cause significant shoulder soreness and an altered, less efficient stride. The Y-front harness, by contrast, has straps that form a ‘Y’ shape on the chest, sitting above the shoulder joints and allowing for a completely unrestricted range of motion. This design is far superior for athletic activities like hiking.
The choice of materials and padding is also critical. A harness that absorbs water and dries slowly will be heavy and more likely to cause chafing. The following table compares three popular harnesses available at Canadian retailers, highlighting features relevant to mountain hiking.
| Feature | Ruffwear Front Range | Rocky Mountain Dog Summit | MEC Trail Light |
|---|---|---|---|
| Design Type | Y-Front | Y-Front with padded chest | Norway style |
| Shoulder Movement | Full extension | Unrestricted | Some restriction |
| Padding Placement | Chest and back | High-density foam chest | Minimal padding |
| Drying Time | 2-3 hours | 1-2 hours | 3-4 hours |
| Price (CAD) | $60-70 | $65-75 | $45-55 |
Even the best-designed harness will chafe if it doesn’t fit correctly. Proper fitting is a non-negotiable final step. A harness should be snug but not tight. You should be able to fit two fingers between the harness and your dog’s body. The straps should not sit in the sensitive ‘armpit’ area.
- Measure your dog’s girth at the widest part of their ribcage, just behind the front legs, to select the correct size.
- Once you have the harness, use the “two-finger rule”: you should be able to comfortably slip two fingers between the harness and any point on your dog’s body.
- Ensure the chest strap sits on the breastbone and does not slide down into the soft tissue of the armpit area, which is a major cause of chafing.
- Adjust all straps evenly so the harness sits centered on the dog’s back and does not rotate or shift excessively during movement.
- Before a long hike, do a short walk test and check your dog’s range of motion. They should be able to fully extend their front legs without the harness pulling or bunching. After the walk, remove the harness and check for any red marks or matted fur.
Now that you understand the science and strategy behind each piece of essential gear, the next step is to audit your own equipment. Ditch the generic checklist and assess your dog’s pack, harness, and first-aid kit against the demanding, real-world standards of the Canadian Rockies. A safe adventure begins long before you reach the trailhead.